Curb And Gutter In Revit

Bim Revit Site Design 03 Creating Curb L Kerb And Pavement On Contours Youtube
Revitcity Com Object Concrete Curb With Gutter Straight Parametric

Gutter End Caps In Revit Architecture Youtube
Create Streets Sidewalks And Curbs Revit Products 2016 Autodesk Knowledge Network

Solved Creating Roads And Curbs Autodesk Community Revit Products

Hidden Gutter In Revit Tutorial Youtube
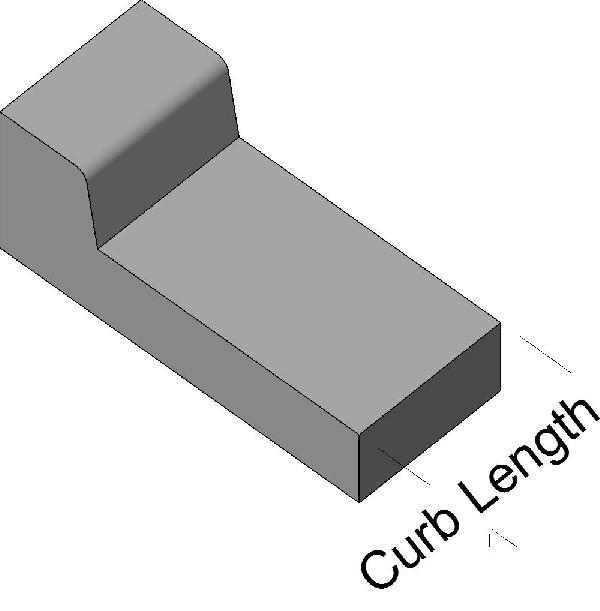
When creating a free standing curb not a curb that surrounds a parking lot or a parking lot island after you select the curb host line the status bar prompts you to pick side for face of curb.
Curb and gutter in revit.
Create Streets Sidewalks And Curbs Revit Products 2017 Autodesk Knowledge Network

Revit Families Series Custom Gutter Profile A How To Guide Youtube

About Streets And Sidewalks Revit Products 2019 Autodesk Knowledge Network
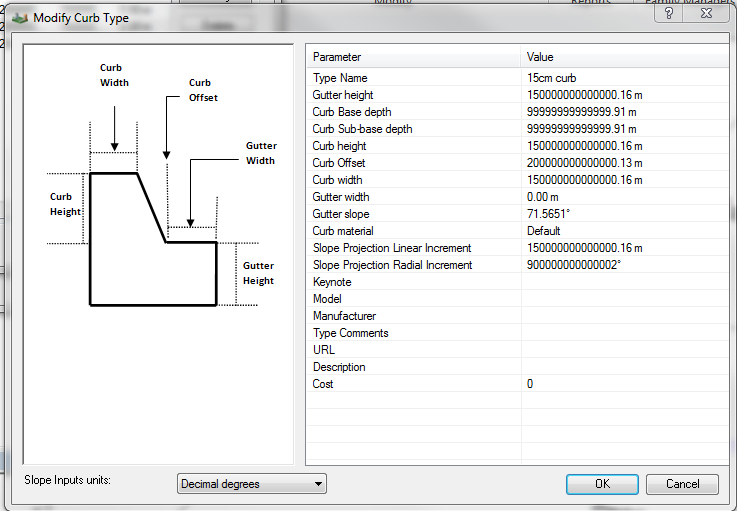
Unexpectedly Large Values For Parameters In New Or Modified Curb Family Type In Site Designer For Revit Revit Products 2018 Autodesk Knowledge Network

Roof Soffits Facias And Gutters In Revit Youtube

Revit Sidewalk Ramp And Curb Kerb Tutorial Youtube

About Curbs Revit Products 2020 Autodesk Knowledge Network

Create Roof Fascias Soffits Gutters And Downpipes In Revit Youtube

About Curbs Revit Products 2019 Autodesk Knowledge Network

Tricks For Create Drainage Sytem In Revit Youtube

Revit 2018 Soffit And Fascia Tutorial Youtube

Roads And Curbs In Revit Tutorial Youtube

Revit Roof Cleaning Up Overlapping Roofs Youtube

Looking For Curb And Gutter Modeling Tips For Parking Lot Projects Autodesk Community Civil 3d

Siteworks For Revit Bim Apps

About Site Designer Revit Products 2019 Autodesk Knowledge Network

Exploring The Revit Architecture Project Templates Lynda Com Tutorial Youtube

Solved Creating A Curb In Revit 2014 Autodesk Community Revit Products
Https Encrypted Tbn0 Gstatic Com Images Q Tbn 3aand9gcrtu Obb Ur Qbakkwtksgql315a Bto4eejxztgys 9vdbiicb Usqp Cau

Revit Profiles A How To Guide Youtube

Revit Roof Basics 10 Slope Arrow Cadclips Youtube

Flat Roofs In Revit Tutorial Youtube

Site Plan In Revit Roads Sidewalks Curbs Tutorial Youtube

Google Image Result For Https I Pinimg Com Originals B0 3e B4 B03eb44e53212f372443d8863be39dbd Jpg In 2020 Rain Chain Roof Detail Gutters
Source : pinterest.com
